The other day a friend asked me if I could make a tie for her little boy to match some skirts I was making her girls. And I thought...duh!...what a great idea! Why have I never tried that before?! My mother-in-law made some really cute ones for the boys a few years back for Easter. They still love them!
So, I thought I should give it a try. I looked around blog land for ideas and instructions, and came up with a pattern that so far I'm happy with. I wanted to make quite a few, so I didn't want a pattern with too many pieces. I made one for a baby/toddler that is pre-tied and snaps at the back of the neck, and a regular tied one for an older child.
They are pretty easy and quick to put together. You need to cut one piece out for the tie and another piece for the backing. For the baby/toddler tie you also need a strip for the neck 16" by 2 1/2" is what I used. You could also do elastic for that piece.
Patterns:
Baby/Toddler tie
Child tie
Once you print out the pages for the patterns, cut out the pieces and line them up so you can tape them together, or trace them onto something stronger like posterboard. With the child tie, you can leave it as two pieces and sew them together, or tape the whole pattern together and have one long piece. When I made some of mine and wanted one long piece so I didn't have to sew them together and have a seam in the middle, I took the two pattern pieces, laid them on my fabric and made it as long as I could. Then I taped them together so I could trace it on my front fabric and backing fabric.
On the ties for the older kids, my pattern was in two pieces because I wanted it longer than my piece of fabric for this one. But I found that the 44-45" that most cottons are was just fine. So for the others that I made, I just had one long piece.
The steps are the same for both sizes/styles of ties.
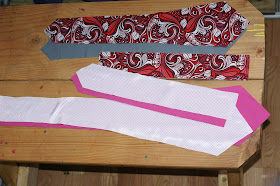
Once you have you fabric and backing cut out, place them right sides together.
Using a 1/4" seam allowance, sew the two pieces together only at the pointy ends, leaving the long sides open.
Flip the tie right side out, and iron the ends so they are nice and crisp. Then take the tie and fold it longways so the front (your outside fabric) has it's right sides together. Sew the long edge closed with a 1/4" seam allowance all the way down. Do not sew the pointed edges closed.
Using a safety pin, pull the smaller end of the tie all the way through until the whole thing is right side out. Then iron it nice and flat so it looks like a tie. If you are making the child size, you are finished! Pretty easy huh? If you are making the baby/toddler size, go on to the next step to attach the neck piece.
To make the piece that goes around the neck, take that strip of fabric you cut and fold it in half with the right sides together. Sew down the long edge, leaving the ends open. Turn it right side out and press flat with an iron. Tuck in the ends and sew them closed. Then you can add a snap, button, or velcro to the ends to secure it. Or you could use a smaller strip of fabric, say 6-8" and sew in elastic for the rest of the strip. Just secure it in the ends before you sew them closed.
Once you have your neck piece finished, you need to tie the tie. Fold the tie over the neck piece with the skinny end in the back and the fat end in the front.
Pull the neck piece up a little into a V to make the rest of the steps a little easier.
Take the skinny end and lay it across the fat side.
Then bring it behind the neck piece and stick it up in the back.
Pull it down through the hole between the fat end and the knot you have made.
Then you have to slide the skinny end around to the back. Just keep shifting the front until it looks good. You can hand stitch the skinny end to the back of the fat end to keep it in place, just be sure not to sew through the front of the tie.
You should have a cute little tie for your cute little guy.
Now you can let them go goof off and be silly.
If you're like me, they probably deserve some time off after the (seemingly) endless times I asked them to come here for just a sec so I could try one on them just this last time.
They were good sports though. And Berkeley was feeling left out wondering which one was for her, so I made a purple and red one just for her to wear. She was quite happy with it.
It's funny, in these pictures it looks like my kids actually get along and maybe (gasp!) even like each other!
No complaints here though. Even if it's just for a few minutes here and there, I'll take it. They were good sports, and really are sweeties!
And they all got a kick out of Tanner eating the mud during the photo shoot too!


