Tuesday, May 8, 2012

Mother's Day Boutique

Over the weekend, I participated in a Mother's Day Boutique to benefit the USO.  This was the first one I've ever done, and I was a bit nervous about how it would go.  I sewed and sewed for like two months to get ready.  I knew I was making too much stuff, but I'd rather have left over things, than not enough.

The first things to sell (and they sold out quickly) were the coloring books and magnet books.  They were a big hit.


My friend Jenny made some really cute strap covers for SLR cameras and some replacement straps for point and shoot cameras too!


My sister and I have been making these easy chenille burp cloths for years, and I saw a really cute way to package them on my cousin's blog here.  So I made a few sets for this event.


I love the carseat canopies that are so popular now.  When I had my last baby, which was only 2 1/2 years ago, I never saw these.  I wish I had, because the girl ones turned out really cute.  I am having a boy in the next week or two, so I made some cool boy ones too, but the ruffles I put on the girl ones really made them super cute!


Here is a picture of my whole booth.  It wasn't too fancy, but I had a good time.


And, I had the best salesman helper ever!  He didn't want to be left out, so he made some drawings to sell for 50 cents each, and sold them all.  He had even more fun than I did!


I did't sell even close to everything I brought, but I sold enough and had a great time with Stephen,my friends, and my family that came to help and support me! 

I had a few people ask about doing custom or future orders too.  You can always e-mail me at bozbaby@live.com and let me know what you're looking for.  I'm sure we can work it out!

Monday, February 27, 2012

Cloth Diapers...DONE!

I've always liked the idea of cloth diapering with the new modern styles of diapers out there.  I have a few I used on my little girl occasionally but never really did it full-on.  With the new baby on the way, I wanted to give it a better shot.  Since this is our fourth and probably last, I wasn't sure I wanted to spend all the money for a whole set of each size in the all-in-ones, and I'm not a big fan of the prefolds with covers.  But, I found tons of free patterns online similar to the ones I already had.  So, I thought I would give it a try.  I made a couple and tried them out for leaking as best I could with out a small baby to try them on.  They did great, and weren't too difficult to make.


I think they turned out pretty good, and I have patterns for the bigger sizes if I decide to keep going when he outgrows these.  With all the materials, these ones only cost $2-$3 each, instead of $18-$20 to buy them.  With the time it took to make them, it was still well worth it.

I told myself if I was going to do this, I had to finish these before I could start sewing any more fun stuff for the baby.  Well, I finished all the topstitching today, and I'm DONE!!  I have a nice big stack of 15 newborn diapers!  Now I can start on the carseat, crib bedding, nursing covers, slings, etc.  It's nice to have them finished.  I just have to wait and see if they work as well as I'm hoping!


Oh, and my four-year-old has been very interested in them.  So, since he still needs something at night, I made four training pants for him with the larger diaper pattern.  I just cut off the tab parts and put some knit ribbing on the sides to make them stretchy so he can put them on himself.  He likes these so much better than wearing a baby diaper like his little sister.

Wednesday, February 22, 2012

Magnet Board Books


With three small kids, I am always on the lookout for quiet activities to bring along with us.  Whether it is for church, waiting rooms, or at a restaurant, it seems like we always have a little time where it would be nice to have them busy doing something quietly.

I like the file folder games, but don't really want to carry a folder for each game, and the velcro is a bit noisy.  I have made some magnet boards for our house that I really like and thought maybe they would make good books too.  They turned out really cute, and the kids love doing the magnet stories.  They are super easy, and don't take long to make.

To start, you will need:
     19”x14” piece of outer fabric
     19”x14” piece of inner fabric
     19”x14” piece of fleece or quilt batting
     20” of strap webbing (cut into 2- 10” pieces)
     2- 8”x12” pieces of sheet metal (roofing section at Home Depot)
     2 pieces of scrap cardboard about 8 ¼”x12 ¼”
     some masking tape

For all fabrics, the 19” sides will be the top and bottom, and the 14” will be the sides. If your fabric has a pattern that has a right way, make sure you get enough so the pattern isn’t sideways. If it can go any way, 1/2yd will be enough to make two. The outer fabric can be whatever you want. The fat quarters work well if you don’t want to buy extra fabric. The inner fabric I used was a solid color cotton, but you can use flannel if you want it to be a flannel board too, but some magnets might not be strong enough to hold on through the flannel. I like to use fleece instead of batting so the cardboard doesn’t get stuck on it when I slide it in, and I like it to be padded, but not too squishy.


Find the center of one of the 14” sides of your outer fabric.


 Place the edges of one strap 1 ½” above and below that center mark so there is 3” between the ends. The ends of the strap should be even with the raw edges of your fabric. Pin in place well, and repeat for the other 14” side. (you can melt the edges of the straps with a lighter so they don’t fray)


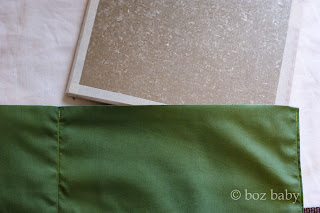
Lay your fleece down and place your outer fabric face up on top of it.  Next, place your inner fabric face down over that.  Pin those three layers together. (note: this picture shows a different outer fabric, but the instructions are the same)


Sew through all three layers, down one side, across the bottom, and up the other side leaving the top edge open.


Flip right side out and iron seams so they are nice and crisp.  Fold the top edge in about ½” and iron. 


Next, fold the whole thing in half like a book to find the middle and iron a crease down the center.  Or, find the center and mark with pins. 


Following the crease or the pins, sew a seam down that center line to create two pockets at the top.


Sewing very close to the edge, top stitch around the sides and bottom (still leaving the top open).


Now tape your metal sheets onto the cardboard making sure you cover the metal corners so they don’t cut through the fabric after awhile. 


Slide the metal and cardboard into the pockets with the cardboard toward the fleece and the metal facing the inside fabric.


Sew the top of the pockets closed with a small seam allowance to match the topstitching you did around the other sides.


That’s it.  Your magnet board book is finished!


Here are some ideas of things to use in your magnet books:
     file folder games or felt board stories  here 
     whole things cut in half to match up (butterflies, balls, shapes, etc)
     poetry or word sets from the store that you make sentances with
     family or magazine pictures cut into puzzles
     favorite scripture heros
     paper dolls with clothes (princesses, pirates, snowman, etc)  here
     characters from favorite shows or books printed from websites to act out stories
     nursery rhymes or little songs (five little monkeys)


There are so many different things you can do for these.  After I print and color my pieces, I laminate them so they last longer.  You can use packing tape to do this if you don't have a laminating machine.  Test the strength of your magnets before you stick them on all your pieces to make sure it is strong enough.  Also, sticky magnets don't always stick very well to laminated things.  So if you use this kind of magnet, maybe print your pieces on heavy cardstock and only put the packing tape on the front so the magnet can stick to the paper on the back.  Don't use hot glue to attach your magnets, because sometimes the heat can affect their power.  The magnets I like best are ones I got online.  They are small discs I found from http://www.kjmagnetics.com/ .  They are very small and really strong.  I used some E-6000 glue from Michaels, and that has worked really well.


If you are doing a paper doll or a scene with characters, try to put the magnets for the background or doll off in the corner where you won't be putting other pieces over them. 

My kids love using these at church, and other places too.  I have individual games/activites in ziplock bags to make it easy to find the one you want.  If I think of other ideas for activites, I will add them to the list above.


I hope you all enjoy these!  They are fun to have around, and make great gifts for birthday kids too!

Wednesday, February 15, 2012

Valentine's Day

I hope everyone's Valentine's Day was very fun and sweet!  I know ours was. 


We made lots of yummy treats together instead of buying gifts.  We made cake balls for the teachers and some chocolate strawberries and candy apples for eachother.  We had a cupcake party at a friend's house and made more tasty treats there too!


For breakfast we had whole wheat pancakes with strawberry hearts and strawberry milk.  I wish I could say that they all got eaten up really quickly, but only one of the three kids cleaned their plate.  One ate all the strawberries off and the other pushed them aside and only ate the pancakes.  I'm going to count it as a success anyway though.


Happy Valentine's Day! (even if it's a day late)


Monday, January 2, 2012

DIY Maternity Pants

You would think that by my fourth kid I would have the maternity clothes that I want, but not so.  Everytime I start wearing them, I want to find new ones- pants mostly. 

So a few weeks ago my regular pants were getting too tight on my tummy when I sat down, but I didn't want to start wearing my maternity ones just yet.  I went shopping for some "fat pants" a few sizes bigger than I usually wear.  I thought I could wear them for a couple of months now, and also right after the baby is born.  I found some cute jeans on clearance for seven bucks at Khol's so I bought a couple pairs. 

Well, I started showing more and more a lot quicker this time, so even those started getting too tight.  So, I thought I would just turn them into maternity jeans since I liked how they fit and wanted some more anyway.  And they were so cheap I wasn't too worried about messing them up.


So, to start I had my jeans (bigger than my regular size).
Then I got some 3" elastic and some knit ribbing in navy blue.


I measured the front of my pants between the side seams for the elastic. The knit ribbing I made a coulple inches longer, and 7" tall to fold over the elastic, and fold in at the sides.

The first step you want to do is cut out the zipper, pin it, and sew it closed. You don't want the metal teeth getting under your needle when you sew the elastic on.  I did this a few steps later, but I think it is better to do it first to keep it in place.


Next, see how far down your elastic goes and cut out the front of your pants. When you do this, cut a little less off than you think. You want the elastic to overlap the pants a little so you can sew them together. I think I cut off about 2 1/2 inches instead of 3. Be sure to look at where your rivets and pockets are when you are deciding where to cut. You will need a little room for a seam allowance, so don't cut too close. If your belt loops get cut in half like mine did, just cut the bottom part of them off as best you can without cutting a hole in the pants.


 I serged the top of the cut that I made to hold the pockets and fly in place. If you have a serger, I think this is a good step, if you don't, you can just sew a line close to the edge to do the same thing.


(This is when I sewed the zipper part closed by sewing close to the original seam, but I think it's better to do this first because mine got a little bunched up.) 


 Now, place the elastic inside the pants, and pin it in place. Be sure the elastic isn't sticking up over the top of the pants on the sides. If the elastic is a little shorter than where you are putting it, that's okay. Just find the center and pin it, then keep doing that until it's in place.


 Start sewing at the top of the side and go down, across, and up the other end. Use a small seam allowance and pull the elastic so the pants are flat while you sew.


 Once the elastic is on, get the knit ribbing in place by lining it up with the top of the raw edge of the jeans. I forgot to fold over the side in this picture before I started pining, but you can see it in the next picture. Fold it on both sides of the ribbing. You don't really need to pin this much because you will stretch it while you are sewing.


 Sew across the ribbing from edge to edge. Pull the ribbing a bit while you sew to make it tight and keep it from bunching up. Use a little bigger seam allowance than you used for the elastic. You want that seam to be inside of this one. Also, remember where your rivets are if you have any so you don't break your needle.


 Now, fold the ribbing over and to the back side of the elastic. I just left mine raw at the inside edge, but you could also fold the edge under to make a nice hem. Stretch it a little and pin it in place.


 With the front of the pants up to you, sew down the sides and across the bottom of the ribbing with a very small seam allowance. This will make a top stitch on the front of the jeans, and sew the ribbing to the sides and inside of the pants as well.


 Since I left my ribbing raw inside, I just trimmed off the extra fabric (make sure you don't cut off your pockets though).


 And there you have it. An easy way to make some maternity pants (or just some strechy pants to wear to Thanksgiving next year) if you can't find some you like (or are too tall for the ones you do). Don't try this with your favorite jeans though, it can't be undone and you might regret it later. Just find some new ones on sale, or some used ones that will work. Also, since they still have the belt loops on the back and sides, you can wear a belt as long as it doesn't cut into your tummy too much.


 Happy belly growing! Oh, and since we are having another boy I will try to share baby boy stuff I've been making too. Also, I love pictures of kids waiting to open gifts on Christmas, so I thought I would share ours.